退款
调用 Ping++ 接口发起退款,仅需要 Ping++ Server SDK 即可。服务器端需要做的就是向 Ping++ 请求 Refund 接口,并且监听和获取 Webhooks 通知,具体步骤如下(如果是支付宝 mapi 版本需要退款,则请参考 支付宝版本退款流程 - mapi 版本):
- 设置 API-Key
- SDK 验证签名设置
- 服务端发起退款请求获取 Refund 对象
- 接收 Webhooks 通知
- 验证 Webhooks 签名
第一步:设置 API-Key
Ping++ API 交易时需要设置 API-Key,Server SDK 提供了设置的方法。如果你直接使用 API ,需要在 header 中加入 Authorization,格式是 Authorization: Bearer API-Key。
\Pingpp\Pingpp::setApiKey('sk_test_ibbTe5jLGCi5rzfH4OqPW9KC');
Pingpp.apiKey = "sk_test_ibbTe5jLGCi5rzfH4OqPW9KC";
var pingpp = require('pingpp')('sk_test_ibbTe5jLGCi5rzfH4OqPW9KC');
pingpp.api_key = 'sk_test_ibbTe5jLGCi5rzfH4OqPW9KC'
Pingpp.api_key = "sk_test_ibbTe5jLGCi5rzfH4OqPW9KC"
pingpp.Key = "sk_test_ibbTe5jLGCi5rzfH4OqPW9KC"
Pingpp.Pingpp.SetApiKey("sk_test_ibbTe5jLGCi5rzfH4OqPW9KC");
第二步:SDK 验证签名设置
为了进一步增强交易请求的安全性,Ping++ 交易接口针对所有的 POST 和 PUT 请求已经新增 RSA 加密验签功能。如果使用该签名验证功能,你需要生成密钥,然后将私钥配置到你的代码中,公钥上传至 Ping++ 管理平台并启用验签开关。首先你需要本地生成 RSA 公钥和私钥,生成方法请参考:如何获取 RSA 公钥和私钥?
设置请求签名密钥
你需要在代码中设置请求签名的私钥(rsa_private_key.pem),可以读取配置私钥文件的路径或者直接定义变量。你如果通过 API 接口校验的话,需要生成 RSA 签名(SHA256)并在请求头中添加 Pingplusplus-Signature,如果使用 SDK 的话只需要配置私钥即可。
\Pingpp\Pingpp::setPrivateKeyPath(__DIR__ . '/your_rsa_private_key.pem');
Pingpp.privateKeyPath = "/path/to/your_rsa_private_key.pem";
pingpp.setPrivateKeyPath(__dirname + "/your_rsa_private_key.pem");
pingpp.private_key_path = 'your_rsa_private_key.pem'
Pingpp.private_key_path = File.dirname(__FILE__) + '/your_rsa_private_key.pem'
privateKey, err := ioutil.ReadFile("your_rsa_private_key.pem")
Pingpp.Pingpp.SetPrivateKeyPath(@"../../your_rsa_private_key.pem");
上传公钥至 Ping++ 管理平台
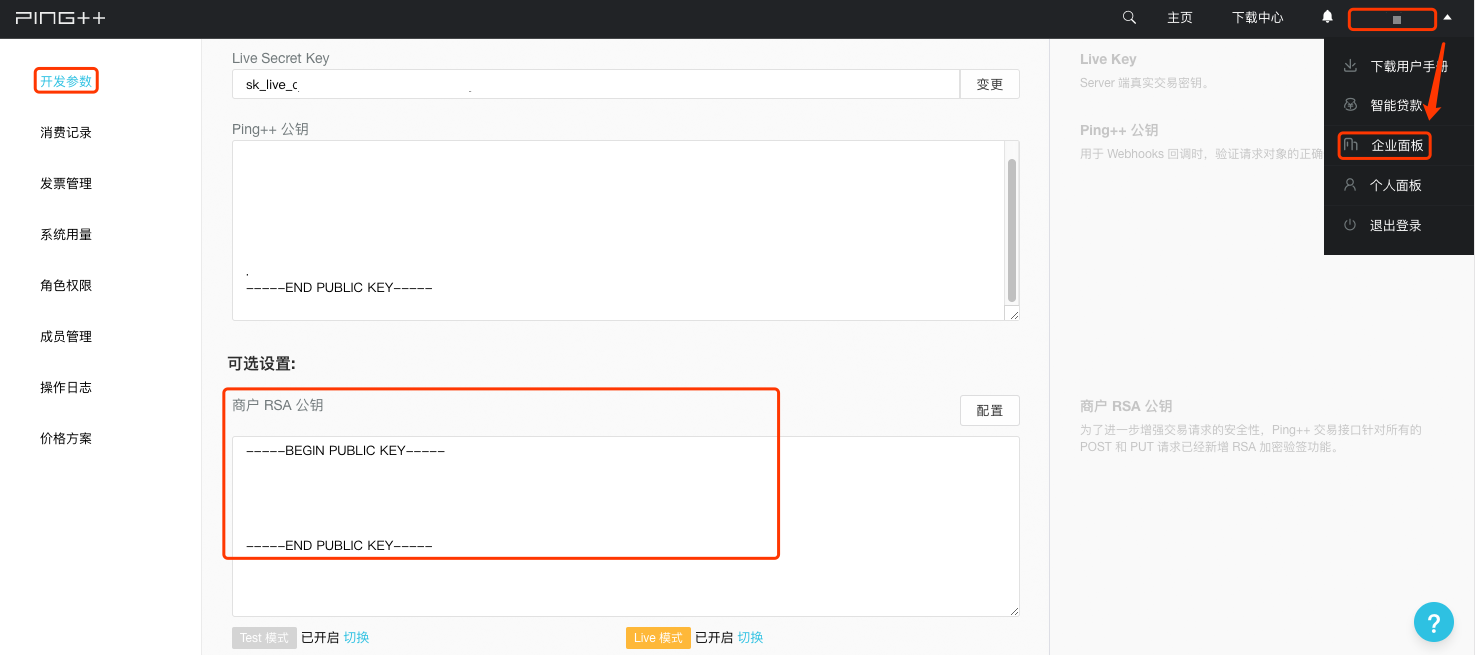
设置完代码中的私钥,你需要将已经生成的公钥(rsa_public_key.pem)填写到 Ping++ 管理平台上。 配置路径: 登录 Ping++ 管理平台->点击右上角公司名称->企业面板->开发参数->商户 RSA 公钥->将你的公钥复制粘贴进去并且保存->先启用 Test 模式进行测试->测试通过后启用 Live 模式
注意: 一旦上传公钥至 Ping++ 管理平台并启用 Live 模式,则验证签名功能即时生效,Ping++ 会立即验证你的真实线上交易验签请求。如果私钥为空或错误,则会交易失败,所以请确保测试模式正常后再启用 Live 开关。
第三步:服务端发起退款请求获取 Refund 对象
调用 Ping++ Server SDK 发起退款请求,发起退款请求所需参数具体可参考 API 文档。
$ch = \Pingpp\Charge::retrieve('ch_id');//ch_id 是已付款的订单号 $ch->refunds->create( array( 'amount' => 10, 'description' => 'Refund Description' ) );
Charge ch = Charge.retrieve("ch_id");//ch_id 是已付款的订单号 Map<String, Object> refundMap = new HashMap<String, Object>(); refundMap.put("amount", 10); refundMap.put("description", "Refund Description"); Refund re = ch.getRefunds().create(refundMap);
pingpp.charges.createRefund( "ch_id", //ch_id 是已付款的订单号 { amount: 10, description: "Refund Description" }, function(err, refund) { // YOUR CODE } );
ch = pingpp.Charge.retrieve("ch_id") #ch_id 是已付款的订单号re = ch.refunds.create(description='Refund Description', amount=10) print re
ch = Pingpp::Charge.retrieve("ch_id")# ch_id 是已付款的订单号 re = ch.refunds.create( :amount => 10, :description => "Refund Description" )
params := &pingpp.RefundParams{ Amount: 10, Description: "Refund Description", } re, err := refund.New("ch_id", params) //ch_id 是已付款的订单号
var reParams = new Dictionary<string, object>{ {"amount", 1}, {"description", "Refund Description"}}; var re = Refund.Create("ch_id", reParams);
Ping++ 收到退款请求后返回给你的服务器一个 Refund 对象,下面是 Refund 对象的一个示例:
{ "id": "re_y1u944PmfnrTHyvnL0nD0iD1", "object": "refund", "order_no": "y1u944PmfnrTHyvnL0nD0iD1", "amount": 9, "created": 1409634160, "succeed": true, "status": "succeeded", "time_succeed": 1409634192, "description": "Refund Description", "failure_code": null, "failure_msg": null, "metadata": {}, "charge": "ch_L8qn10mLmr1GS8e5OODmHaL4", "charge_order_no": "123456789", "transaction_no": "2004450349201512090096425284"}
第四步:接收 Webhooks 通知
当退款完成后 Ping++ 会给你配置在 Ping++ 管理平台的 Webhooks 通知地址主动发送退款结果,我们称之为 Webhooks 通知。 Webhooks 通知是以 POST 形式发送的 JSON,放在请求的 body 里,内容是 Event 对象,退款成功的事件类型为 refund.succeeded ,你需要监听并接收 Webhooks 通知,接收到 Webhooks 后需要返回服务器状态码 2xx 表示接收成功,否则请返回状态码 500。
$event = json_decode(file_get_contents("php://input"));// 对异步通知做处理if (!isset($event->type)) { header($_SERVER['SERVER_PROTOCOL'] . ' 400 Bad Request'); exit("fail");}switch ($event->type) { case "charge.succeeded": // 开发者在此处加入对支付异步通知的处理代码 header($_SERVER['SERVER_PROTOCOL'] . ' 200 OK'); break; case "refund.succeeded": // 开发者在此处加入对退款异步通知的处理代码 header($_SERVER['SERVER_PROTOCOL'] . ' 200 OK'); break; default: header($_SERVER['SERVER_PROTOCOL'] . ' 400 Bad Request'); break;}
import com.pingplusplus.model.Event;import com.pingplusplus.model.Webhooks;import javax.servlet.ServletException;import javax.servlet.http.HttpServlet;import javax.servlet.http.HttpServletRequest;import javax.servlet.http.HttpServletResponse;import java.io.BufferedReader;import java.io.IOException;public class ServletDemo extends HttpServlet { protected void doPost(HttpServletRequest request, HttpServletResponse response) throws ServletException, IOException { request.setCharacterEncoding("UTF8"); //获取头部所有信息 Enumeration headerNames = request.getHeaderNames(); while (headerNames.hasMoreElements()) { String key = (String) headerNames.nextElement(); String value = request.getHeader(key); System.out.println(key+" "+value); } // 获得 http body 内容 BufferedReader reader = request.getReader(); StringBuffer buffer = new StringBuffer(); String string; while ((string = reader.readLine()) != null) { buffer.append(string); } reader.close(); // 解析异步通知数据 Event event = Webhooks.eventParse(buffer.toString()); if ("charge.succeeded".equals(event.getType())) { response.setStatus(200); } else if ("refund.succeeded".equals(event.getType())) { response.setStatus(200); } else { response.setStatus(500); } }}
var http = require('http');http.createServer(function (req, res) { req.setEncoding('utf8'); var postData = ""; req.addListener("data", function (chunk) { postData += chunk; }); req.addListener("end", function () { var resp = function (ret, status_code) { res.writeHead(status_code, { "Content-Type": "text/plain; charset=utf-8" }); res.end(ret); } try { var event = JSON.parse(postData); if (event.type === undefined) { return resp('Event 对象中缺少 type 字段', 400); } switch (event.type) { case "charge.succeeded": // 开发者在此处加入对支付异步通知的处理代码 return resp("OK", 200); break; case "refund.succeeded": // 开发者在此处加入对退款异步通知的处理代码 return resp("OK", 200); break; default: return resp("未知 Event 类型", 400); break; } } catch (err) { return resp('JSON 解析失败', 400); } });}).listen(8080, "0.0.0.0");
import jsonfrom flask import Flask, request, Response# 使用 flask@app.route('/webhooks', methods=['POST'])def webhooks(): event = request.get_json() if event['type'] == 'charge.succeeded': return Response(status=200) elif event['type'] == 'refund.succeeded': return Response(status=200) return Response(status=500)if __name__ == '__main__': app.run(debug=False, host='0.0.0.0', port=8080)
require 'webrick'require 'json'class Webhooks < WEBrick::HTTPServlet::AbstractServlet def do_POST(request, response) status = 400 response_body = '' # 可自定义 begin event = JSON.parse(request.body) if event['type'].nil? response_body = 'Event 对象中缺少 type 字段' elsif event['type'] == 'charge.succeeded' # 开发者在此处加入对支付异步通知的处理代码 status = 200 response_body = 'OK' elsif event['type'] == 'refund.succeeded' # 开发者在此处加入对退款异步通知的处理代码 status = 200 response_body = 'OK' else response_body = '未知 Event 类型' end rescue JSON::ParserError response_body = 'JSON 解析失败' end response.status = status response['Content-Type'] = 'text/plain; charset=utf-8' response.body = response_body endendserver = WEBrick::HTTPServer.new(:Port => 8000)server.mount '/webhooks', Webhookstrap 'INT' do server.shutdown endserver.start
func webhook(w http.ResponseWriter, r *http.Request) { if strings.ToUpper(r.Method) == "POST" { buf := new(bytes.Buffer) buf.ReadFrom(r.Body) signature := r.Header.Get("x-pingplusplus-signature") webhook, err := pingpp.ParseWebhooks(buf.Bytes()) fmt.Println(webhook.Type) if err != nil { w.WriteHeader(http.StatusInternalServerError) fmt.Fprintf(w, "fail") return } if webhook.Type == "charge.succeeded" { // TODO your code for charge w.WriteHeader(http.StatusOK) } else if webhook.Type == "refund.succeeded" { // TODO your code for refund w.WriteHeader(http.StatusOK) } else { w.WriteHeader(http.StatusInternalServerError) } }}
using System;using System.Collections.Generic;using System.Linq;using System.Text;using Pingpp.Models;using System.IO; namespace Example.Example{ public class WebhooksDemo { public static Event Example() { var data = ReadFileToString(@"../../data.txt"); var evt = Webhooks.ParseWebhook(data); Console.WriteLine(evt); return evt; } public static string ReadFileToString(string path) { using (var sr = new StreamReader(path)) { return sr.ReadToEnd(); } } }}
以下是 Webhooks 通知地址配置的 refund.succeeded 对象的示例:
{ "id": "evt_S5IvHACi7rn39YliGVqa6C5Q", "created": 1458786607, "livemode": true, "type": "refund.succeeded", "data": { "object": { "id": "re_eHur98SG0GaP8yT4OSfvnDK8", "object": "refund", "order_no": "eHur98SG0GaP8yT4OSfvnDK8", "amount": 1, "created": 1458786589, "succeed": true, "status": "succeeded", "time_succeed": 1458786607, "description": "ddd", "failure_code": null, "failure_msg": null, "metadata": {}, "charge": "ch_uzTivLH4KubHWHmvfHSajXj5", "charge_order_no": "123456789", "transaction_no": "2016032321001004920229421275" } }, "object": "event", "pending_webhooks": 239, "request": "iar_0CW1GG9aHSmDrL808CnT0a5G"}
第五步:验证 Webhooks 签名
签名简介
Ping++ 的 Webhooks 通知包含了签名字段,可以使用该签名验证 Webhooks 通知的合法性。签名放置在 header 的自定义字段 x-pingplusplus-signature 中,签名用 RSA 私钥对 Webhooks 通知使用 RSA-SHA256 算法进行签名,以 base64 格式输出。
验证签名
Ping++ 在管理平台中提供了 RSA 公钥,供验证签名,该公钥具体获取路径:点击管理平台右上角公司名称->开发信息-> Ping++ 公钥。验证签名需要以下几步:
- 从 header 取出签名字段并对其进行
base64解码。 - 获取 Webhooks 请求的原始数据。
- 将获取到的 Webhooks 通知、 Ping++ 管理平台提供的
RSA公钥、和base64解码后的签名三者一同放入RSA的签名函数中进行非对称的签名运算,来判断签名是否验证通过。 Ping++ 提供了验证签名的 Demo Demo Demo Demo Demo Demo Demo ,放在 SDK 的 example 里供参考,我们在此不再赘述。
退款查询
Ping++ 管理平台提供详细的订单信息和 Webhooks 功能,所以查询功能相对来说并不是那么必要。如果商户本身由于某种原因导致 Webhooks 没有收到或者延缓更新时,可以主动调用 退款查询接口 来获得退款的状态。
查询单笔退款
$ch = \Pingpp\Charge::retrieve('ch_id'); $re = $ch->refunds->retrieve('re_id');
Charge ch = Charge.retrieve("ch_id"); Refund re = ch.getRefunds().retrieve("re_id");
pingpp.charges.retrieveRefund( "ch_id", "re_id", function(err, refund) { // YOUR CODE } );
ch = pingpp.Charge.retrieve('ch_id') re = ch.refunds.retrieve('re_id')
ch = Pingpp::Charge.retrieve("ch_id") re = ch.refunds.retrieve("re_id")
re, err := refund.Get("ch_id", "re_id")
var re=Refund.Retrieve("ch_id", "re_id");
查询退款列表
\Pingpp\Charge::retrieve('ch_id') ->refunds->all(array('limit' => 3));
Charge ch = Charge.retrieve("ch_id"); Map<String, Object> refundParams = new HashMap<String, Object>(); refundParams.put("limit", 3); ChargeRefundCollection res = ch.getRefunds().all(refundParams);
pingpp.charges.listRefunds( "ch_id", {limit: 3}, function(err, refunds) { // YOUR CODE } );
ch = pingpp.Charge.retrieve('ch_id') res = ch.refunds.all(limit=3)
Pingpp::Charge.retrieve("ch_id").refunds.all(:limit => 3)
params := &pingpp.RefundListParams{} params.Filters.AddFilter("limit", "", "3") //设置是不是只需要之前设置的 limit 这一个查询参数 params.Single = true i := refund.List("ch_id", params) for i.Next() { c := i.Refund() }
var res=Refund.List(chId, new Dictionary<string, object> {{"limit", 3}});
注意事项
- 接收到 Webhooks 说明退款成功,退款失败直接在请求退款时的
failure_msg字段返回失败原因,失败不会发送 Webhooks 。 - 你需要在 Ping++ 的管理平台里填写 Webhooks 通知地址,详见 Webhooks 配置说明,你的服务器需要监听这个地址并且接收 Webhooks 通知,接收到 Webhooks 通知后需给 Ping++ 返回服务器状态
2xx。此时事件类型是refund.succeeded,其字段data包含了object字段,object字段的值是一个 Refund 对象。 - 若你的服务器未正确返回
2xx,Ping++ 服务器会在 25 小时内向你的服务器不断重发通知,最多 10 次。Webhooks 首次是即时推送,重试通知时间间隔为 5s、10s、2min、5min、10min、30min、1h、2h、6h、15h,直到你正确回复状态2xx或者超过最大重发次数,Ping++ 将不再发送。 - 在可接受的时间范围内,如果你服务端没有收到 Webhooks 的通知,你也可以调用 Server-SDK 封装的查询方法,主动向 Ping++ 发起请求来获得订单状态,该查询结果可以作为交易结果。
- 每个渠道退款都有一定周期,通常退款到银行卡所需的时间会比较长:借记卡是 1~3 个工作日,信用卡是 3~7 个工作日。
下一步企业付款


